We are currently still building up the English documentation; not all sections have been translated yet. Please note that there may still be German screenshots or links to German pages even on pages that have already been translated. This guide mostly addresses English speaking users in Germany.
Video
Selection wizard
In this video we explain how to use the Selection wizard in JTL-Shop.
Adding the Selection wizard to JTL-Shop
Your task/initial situation
Step 1: Purchase and activation of a licence
In order to use the selection wizard in JTL-Shop, you need a licence. Proceed as follows to book it:
- Open the JTL-Store and log in with your access data. Go to JTL-Store.
- Select In den Warenkorb (Add to basket) on the Selection wizard page and complete the purchase. At the end of the purchase process, you will receive a licence key for the Selection wizard.
- Now you need to activate the Selection wizard in JTL-Wawi. To do this, switch to the Online shop connection dialogue via the menu Online shop > Online shop connection > Your online shop.
- Click on the Activate module for JTL-Shop button.
- Click on Activate new module and enter the licence key for the Selection wizard. The Selection wizard is now visible in the dialogue Activating the JTL-Shop module under Active modules.
Selection wizard settings
The Selection wizard finds the item the customer is looking for by asking specific questions about certain characteristics. The filtering always takes into account to the previous question. In this way, it is possible to find the desired item after only a few questions.
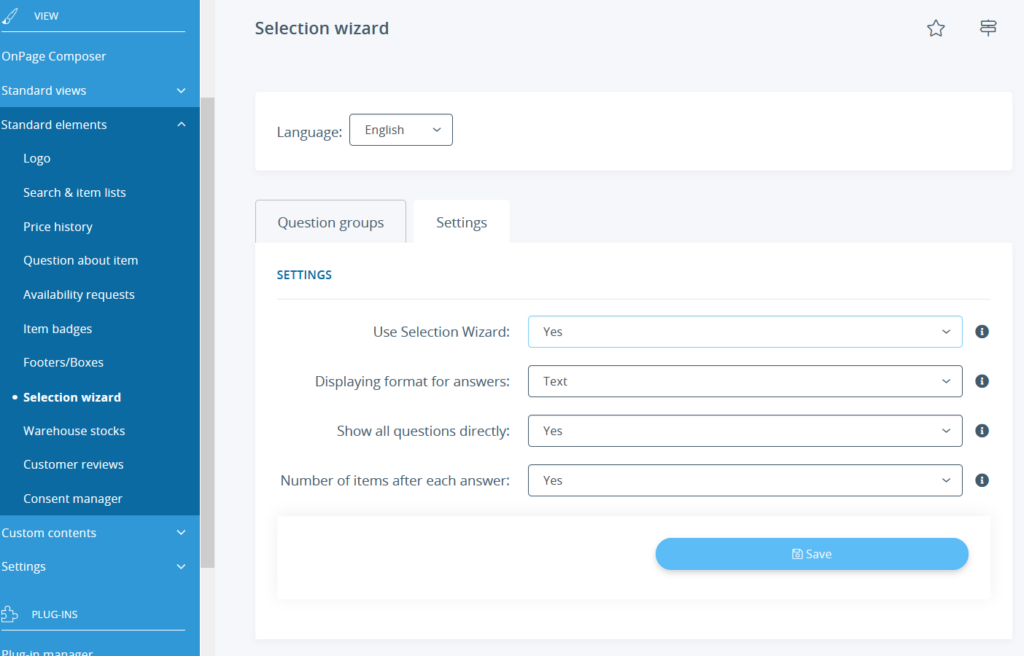
- In the back end of JTL-Shop, go to Standard elements > Selection wizard to open the page Selection wizard.
- Switch to the Settings tab.
- Set the Use Selection wizard option to Yes. Configure the other options if required.
- Save the settings.
Creating question groups and questions
In the next step, you can now create question groups and questions for every group.
- Switch to the Question groups tab.
- Click on the Create question group button. The page Selection wizard – Creating question groups opens.
- Configure your question group.
Name of the question group: Give the question group a name. The question group is listed under this name in the overview.
Description: Enter the description for the question group here. This description is placed before the first question of your Selection wizard and serves as information for the customer.
Category: Here the Selection wizard can be narrowed down to certain or all categories. Either enter the category code in the text box or click Manage categories. You can then search for categories and adopt them.
CMS (Custom pages): You can create your own individual pages on which the question groups will then also appear. If there are several Custom pages, select here on which one the question groups will appear.
Start page: Here you can specify whether a question group should be displayed on the start page of the online shop. Only one question group can be displayed on the start page.
Active: Here you define whether a question group is set to active and is therefore visible to customers in the online shop.
- Save the settings. You will now see the newly created question group.
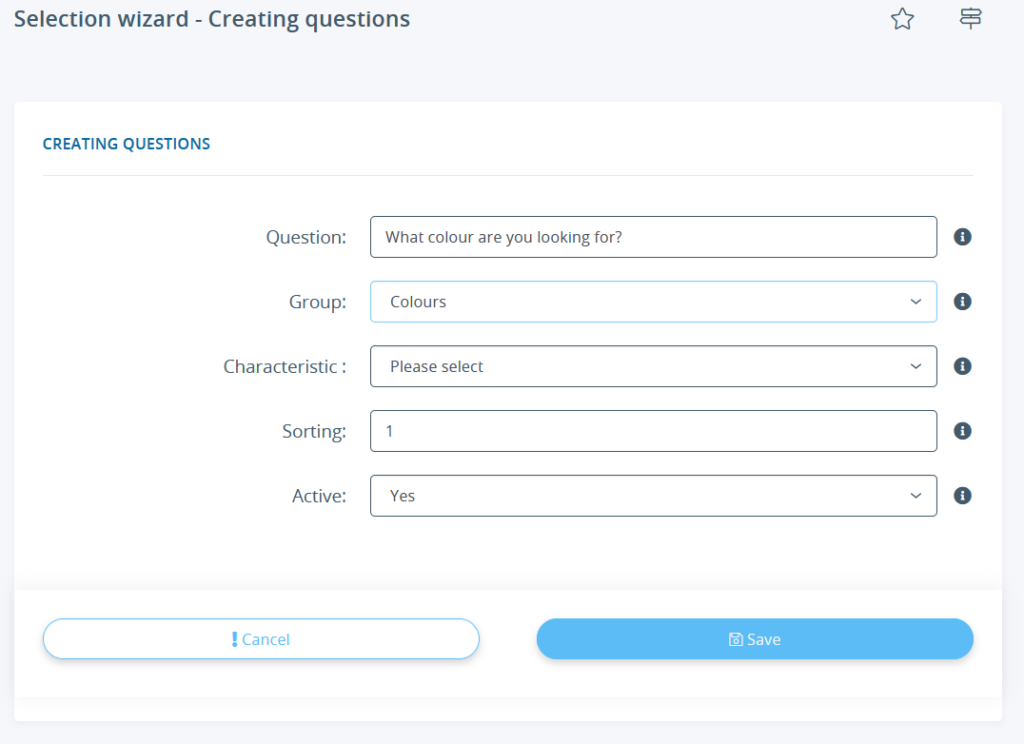
- Then click on Create question. The page Selection wizard – Creating questions opens.
- Set up the question.
Question: Enter your question here with which you would like to guide the shop visitor.
Group: Assign the question to a previously created question group. Each question can only be assigned to one question group.
Characteristic: Enter the characteristic by which the question is to be filtered.
Sorting: If more than one question is to be assigned to a question group, the order of the questions can be set here (1=first position, 2=second position, etc.).
Active: The question can be activated here. Only activated questions are displayed.
- Save the settings. All questions are listed in the overview. You can check everything for accuracy and edit or delete information if necessary.
Presentation in the online shop
The Selection wizard appears in the entered category and displays the individual questions with their possible answers and the number of available items. The customer sees the choices and decides on one of the characteristics. With each further selection, the Selection wizard narrows down the items until either only one item remains or all possibilities are exhausted. In the latter case, a selection of all items with the selected characteristics is shown.
Video
Selection wizard
In this video we explain how to use the Selection wizard in JTL-Shop.


