We are currently still building up the English documentation; not all sections have been translated yet. Please note that there may still be German screenshots or links to German pages even on pages that have already been translated. This guide mostly addresses English speaking users in Germany.
Securing the SQL server connection of JTL-Wawi with SSL
Your task/initial situation
Step 1: Purchase a valid SSL certificate
First you need to purchase a valid SSL certificate. We recommend using one of the official Microsoft certifiers. There are free and fee-based solutions for SSL certificates. Every certificate is issued specifically for the server on which it is to be used later. It is therefore important that the server address you enter when you purchase the certificate is the address via which you access your server. Once you have purchased a certificate, proceed with Step 2.
Step 2: Set up the SSL certificate in the Management Console
Log into the computer on which the SQL server for JTL-Wawi is running.
- Open the Microsoft Windows Management Console. The quickest way to do this is to open the Start menu and enter mmc.
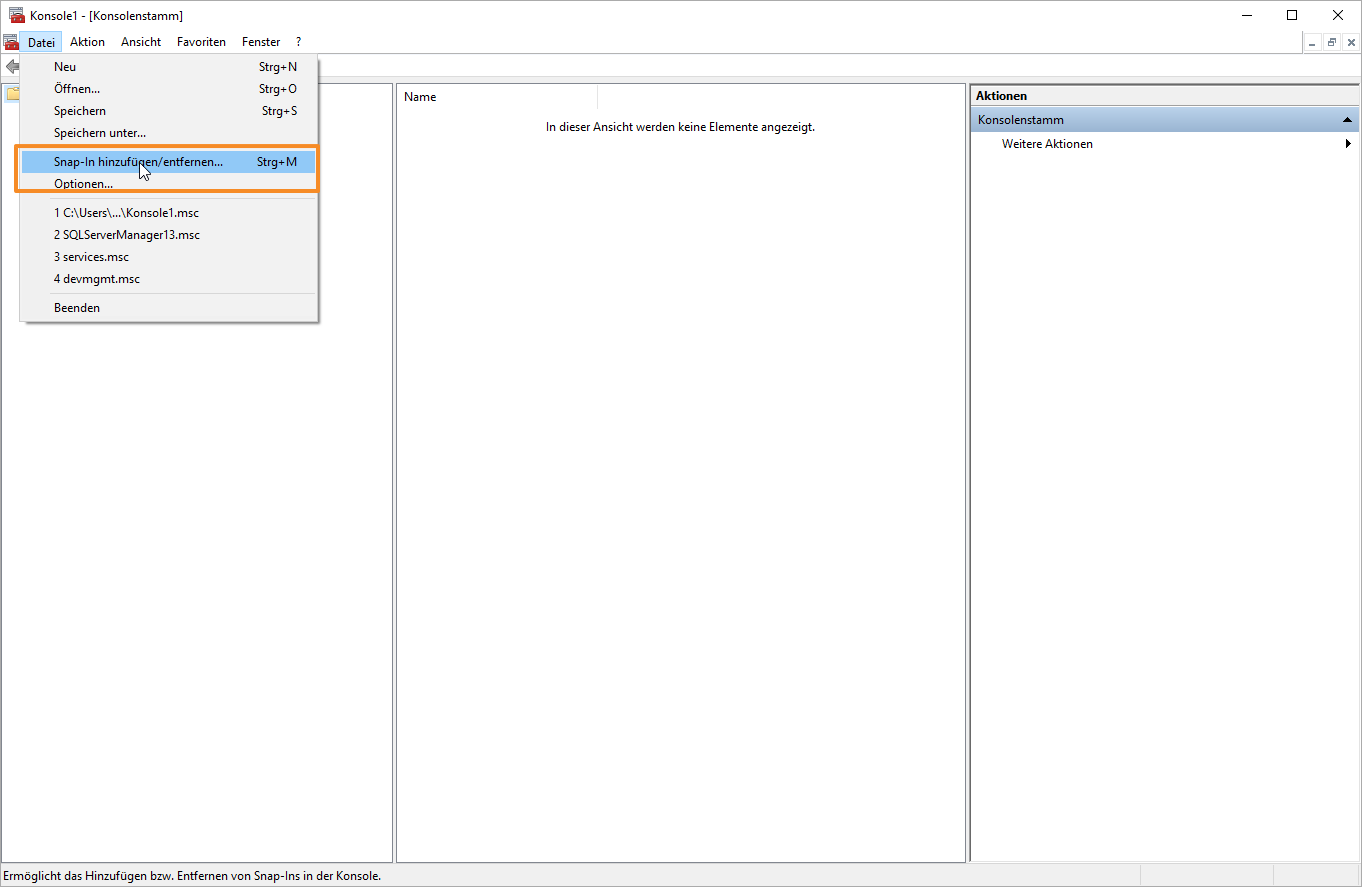
- In the Management Console, go to the menu Datei (File) and select Snap-in hinzufügen/entfernen (Add/Remove snap-in).
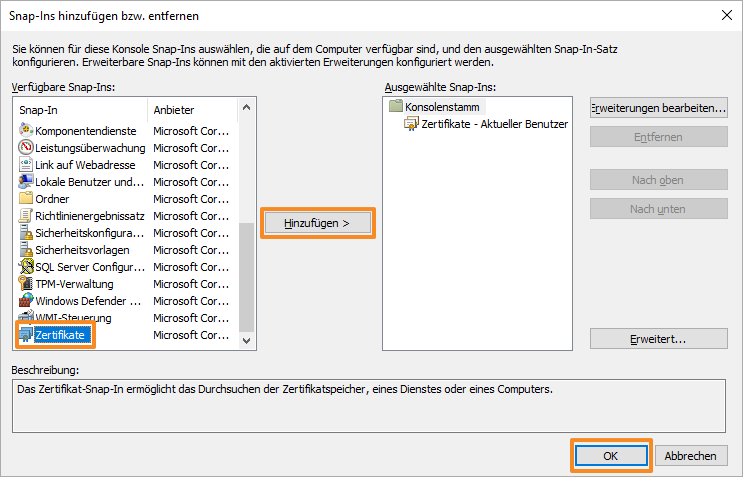
- Select Zertifikate (Certificates) and click Hinzufügen (Add). Then close the window with OK.
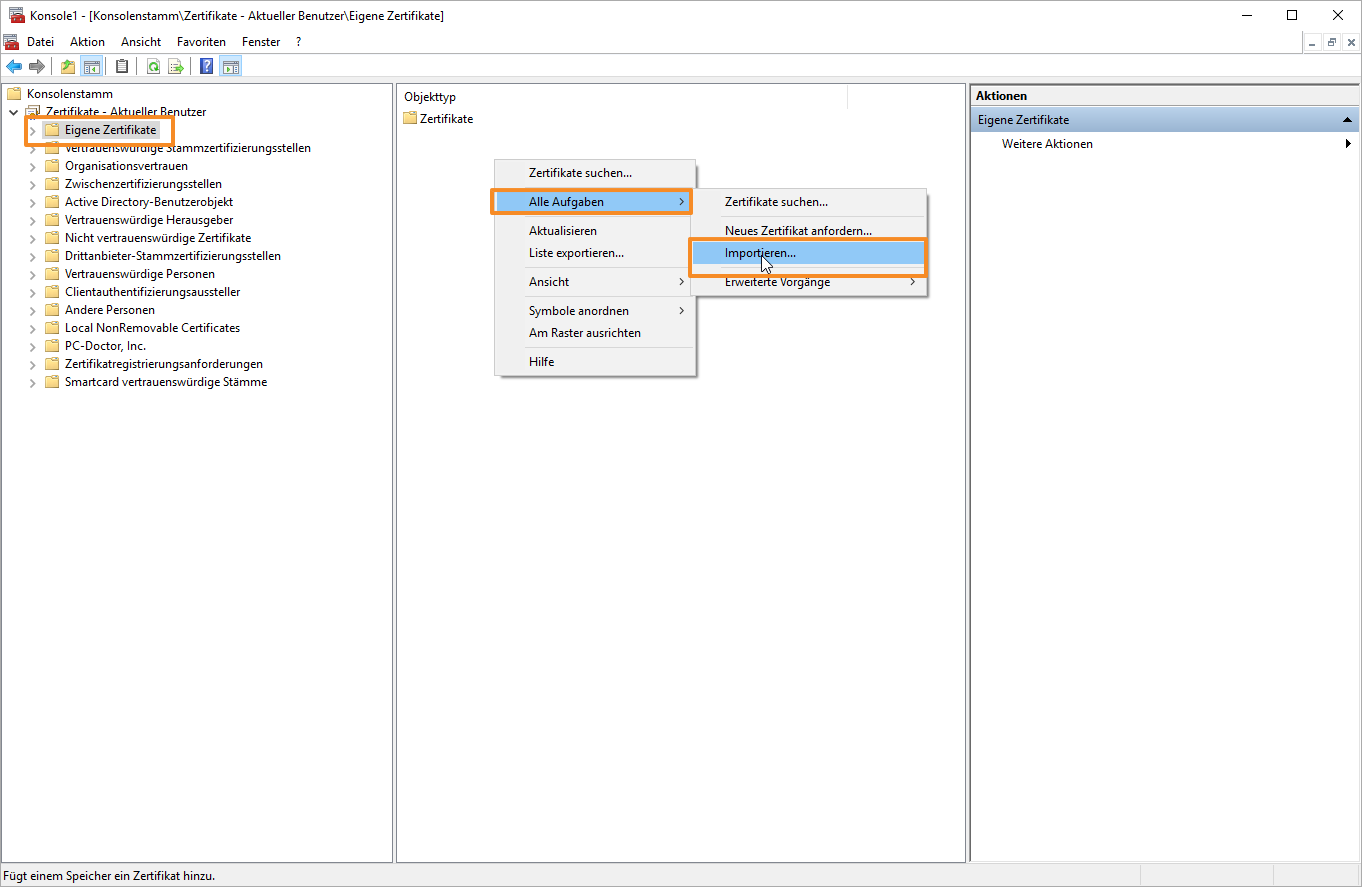
- Under Konsolenstamm (Console root), select Zertifikate – Aktueller Benutzer (Certificates – Current user) and select the folder Eigene Zertifikate (Personal certificates).
- Right-click on the pane Objekttyp (Object type) and select Alle Aufgaben > Importieren (All tasks > Import).
- Add your certificate and click Weiter (Next) to complete the setup.
Step 3: Set up the SSL certificate in the SQL server configuration manager
You now need to set up the SSL certificate in the SQL server configuration manager. This is also performed on the computer on which the SQL server is running.
- Open the SQL server configuration manager for your version of Microsoft SQL Server via the Start menu.
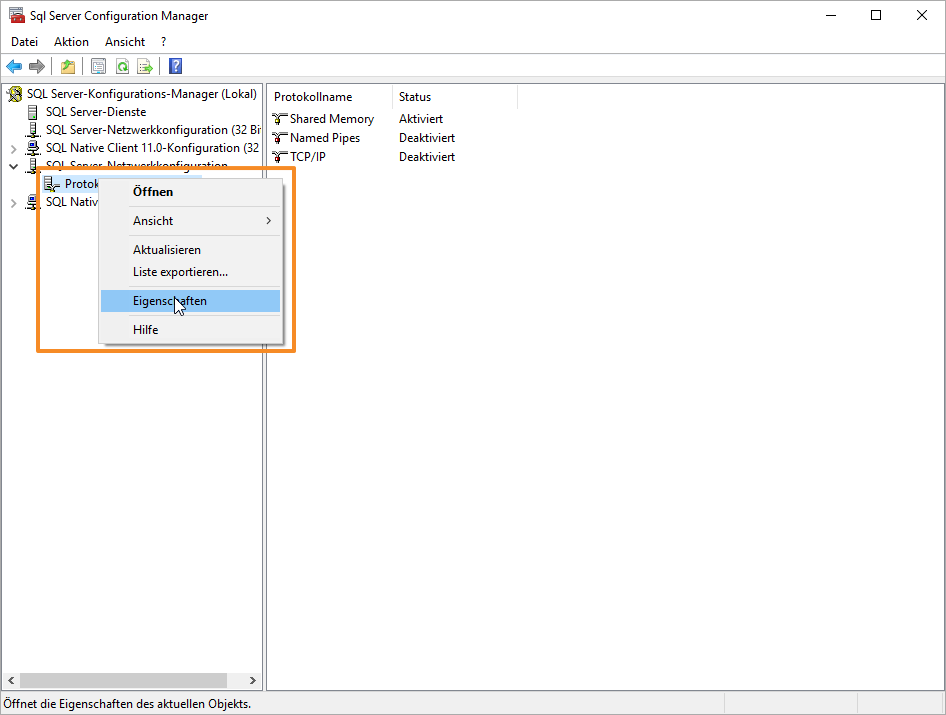
- Click on SQL-Server-Netzwerkkonfiguration (SQL Server Network Configuration).
- Right-click on the entry with your SQL server and select the option Eigenschaften (Properties) in the context menu.
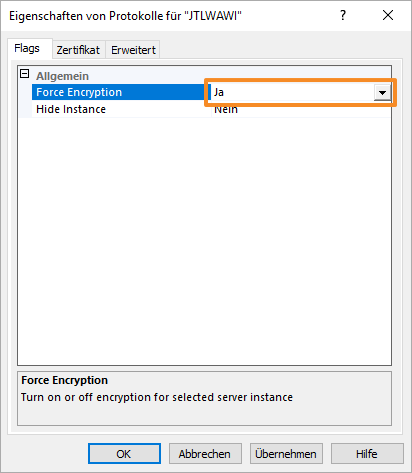
- A window opens. In this window, set the option Force encryption to Ja (Yes).
- Go to the tab Zertifikate (Certificates) and select your SSL certificate.
- Close the window by clicking OK.
- Restart your SQL server. Your connection is now secure.
Tips and tricks for better data security
There are other options available to increase data security alongside securing your connection to the SQL server with an SSL certificate
Different SQL users
With the default setting, every JTL-Wawi user accesses the JTL-Wawi database via the same SQL user. We recommend creating a separate SQL user for each user, i.e. each employee. This offers several advantages:
How to create new SQL users:
- On the computer on which the SQL server is running, open SQL Server Management Studio. If it is not installed on your computer, you can download it here: Microsoft download page.
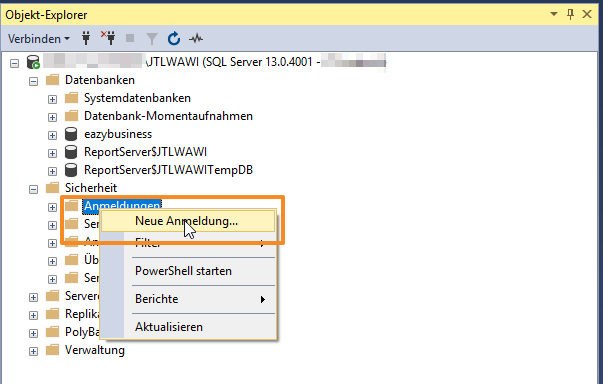
- Log in to the JTL-Wawi SQL server. In the folder Sicherheit (Security), right-click on the folder Anmeldungen (Login) and select Neue Anmeldung (New login) in the context menu.
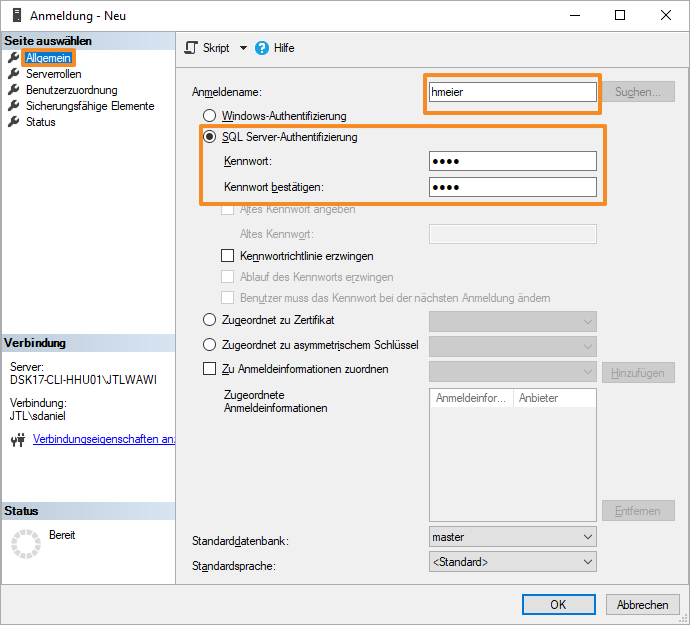
- Enter a Anmeldename (Login name) for the new user and select the option SQL-Server-Authentifizierung (SQL server authentication). Select a Kennwort (Password). Additionally, you can check the option Kennwortrichtlinie erzwingen (Enforce password policy). This means that the password must consist of at least 12 characters, including small and capital letters, numbers and special characters.
- Under the menu item Serverrollen (Server roles), assign the desired role to the user. Here you can, for example, select sysadmin if you want the user to have access to the database administration. If at least one user has sysadmin rights, user sa can later be deactivated (see below).
- Close the dialogue box by clicking OK.
- Then open JTL-Wawi on the user’s/your employee’s computer and open the database administration.
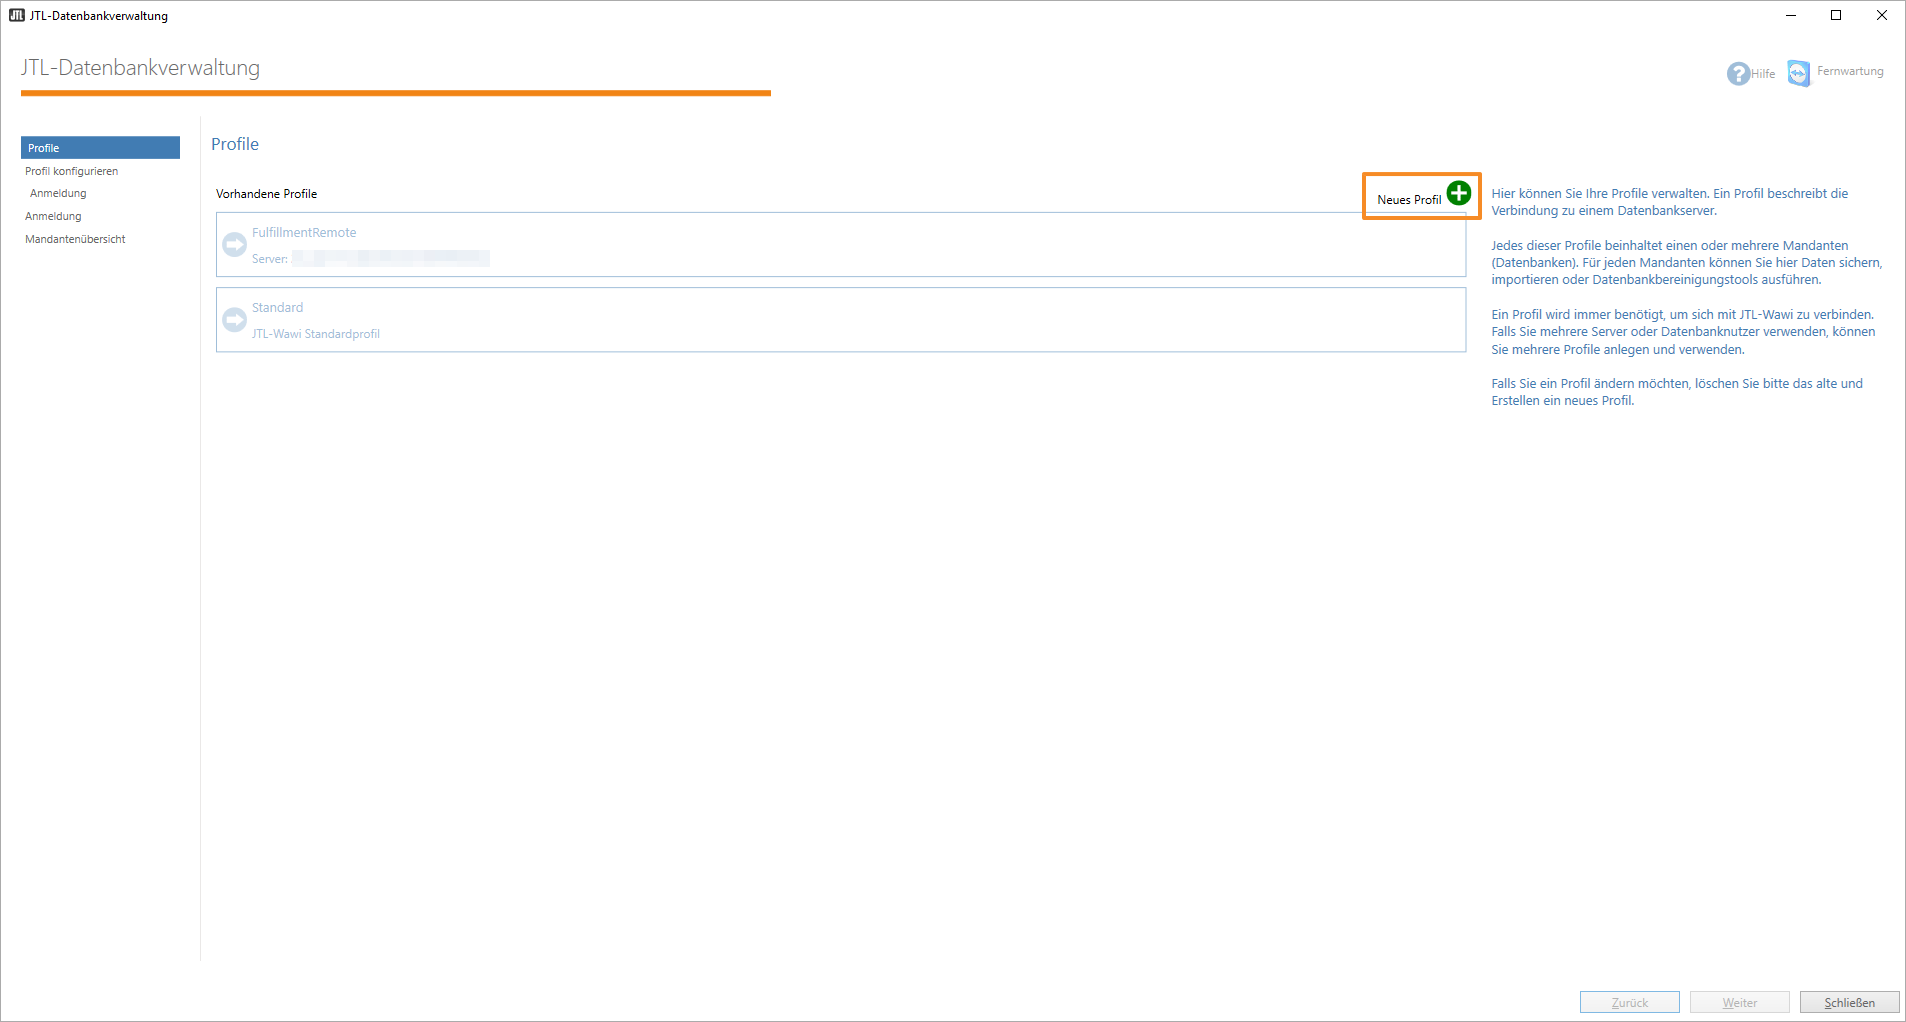
- Click Neues Profil (New profile).
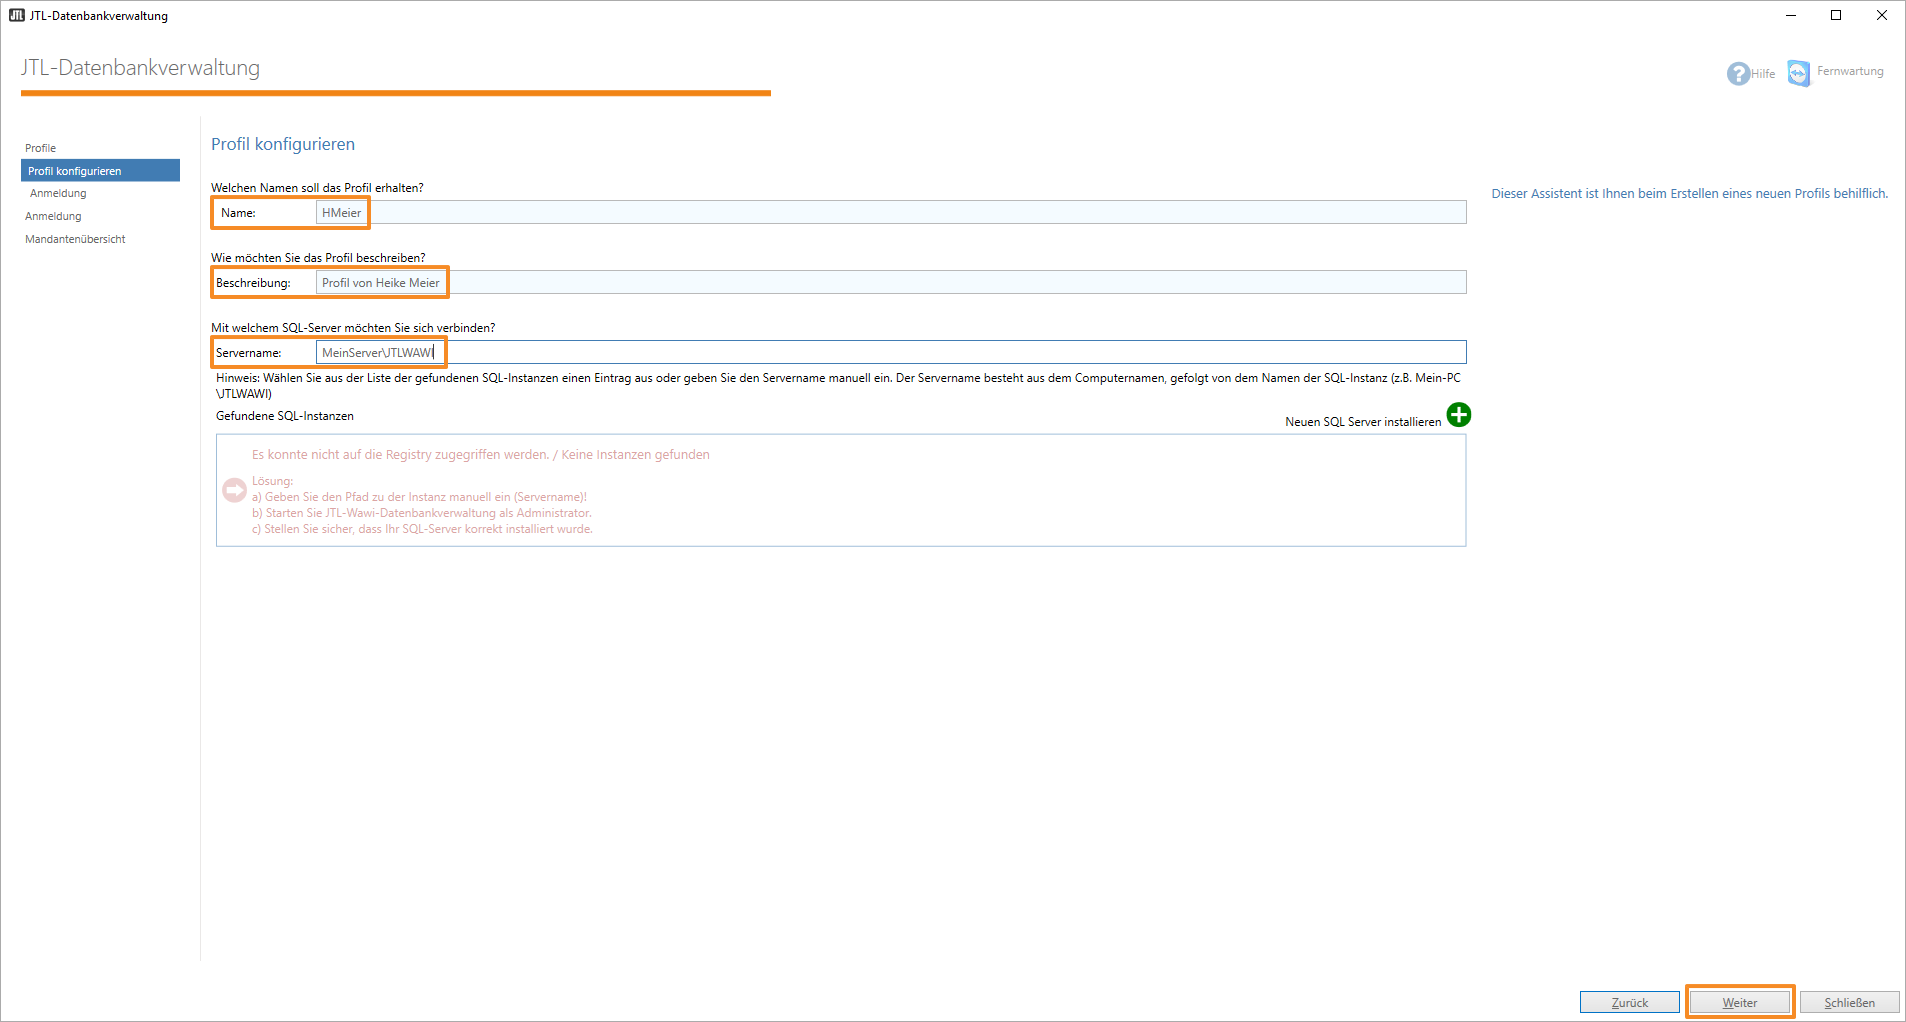
- Enter a profile name, a description and the name of your SQL server in the field Servername (Server name). Click Weiter (Next).
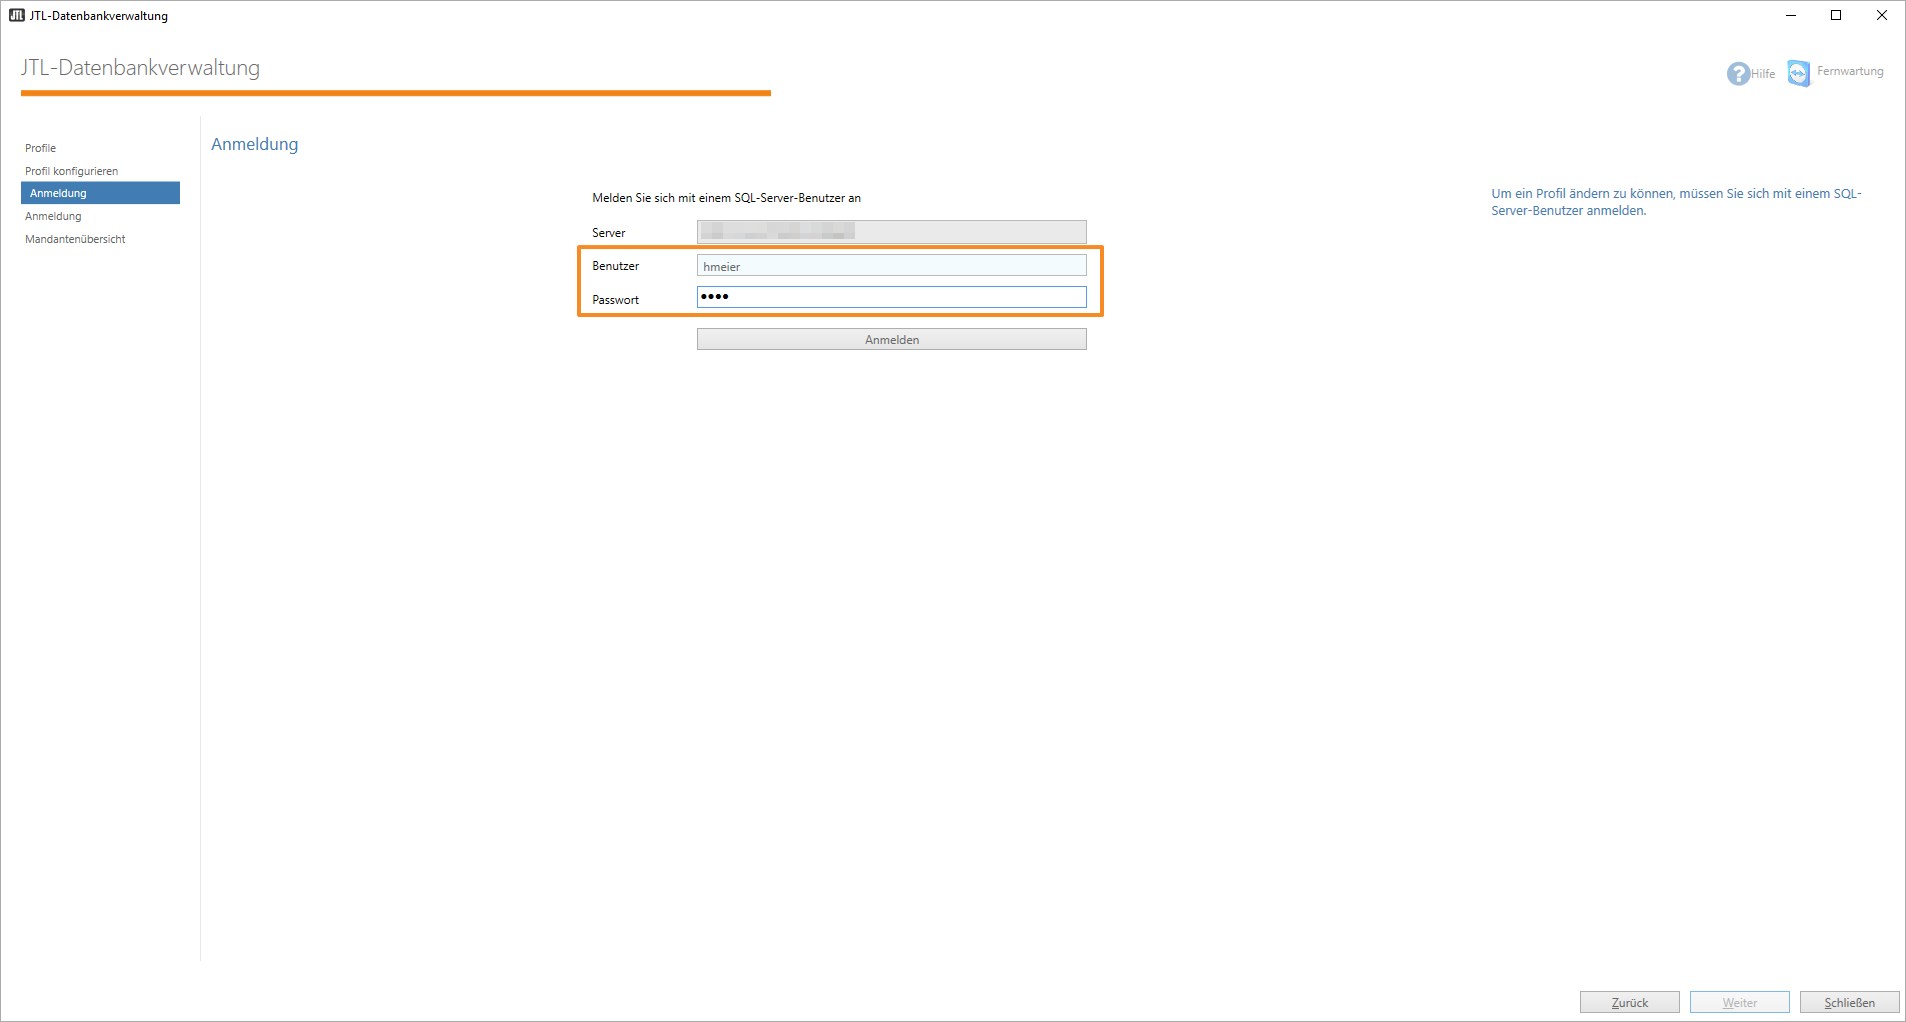
- Enter the Benutzer (User) and Passwort (Password) that you specified in Step 3 of these instructions. To continue, click Weiter (Next). The profile will now be created.
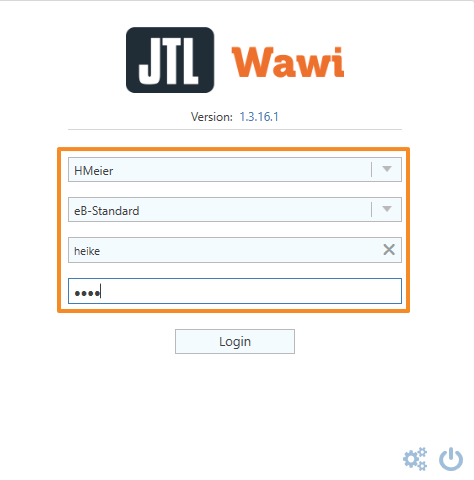
- The user/employee can now access the JTL-Wawi database with this profile. The user/employee continues to use the login data specified in the user management of JTL-Wawi.
Changing sa password
If you install the Microsoft SQL Server during the installation of JTL-Wawi, the default password is sa04jT14. This password is known to anyone who has used products from JTL-Software before. Therefore, we highly recommend choosing a password that is not similar to the default password.
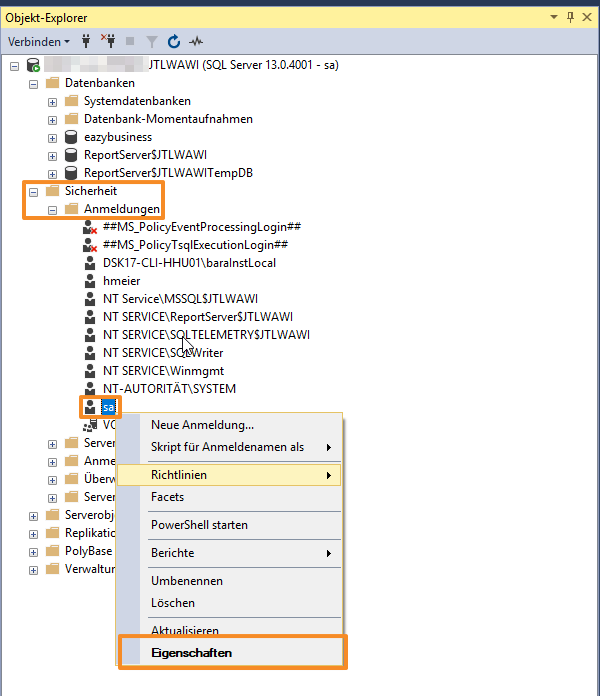
- Log in to Microsoft SQL-Server Management Studio as user sa .
- Expand the folder Sicherheit > Anmeldungen (Security > Login).
- Right-click on user sa and select Eigenschaften (Properties).
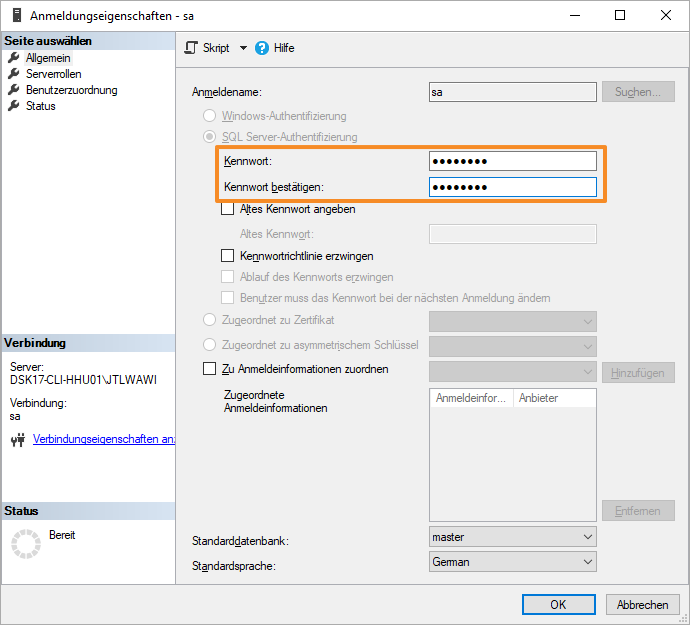
- Into the field Kennwort (Password), enter the new password and confirm it.
Deactivating user sa
Once you have created other users with sysadmin rights, we recommend deactivating user sa completely. User sa is the default user for every Microsoft SQL Server. This makes it one of the most frequent points of attack on the database.
- Log in to Microsoft SQL-Server Management Studio as user sa .
- Expand the folder Sicherheit > Anmeldungen (Security > Login).
- Right-click on user sa and select Eigenschaften (Properties).
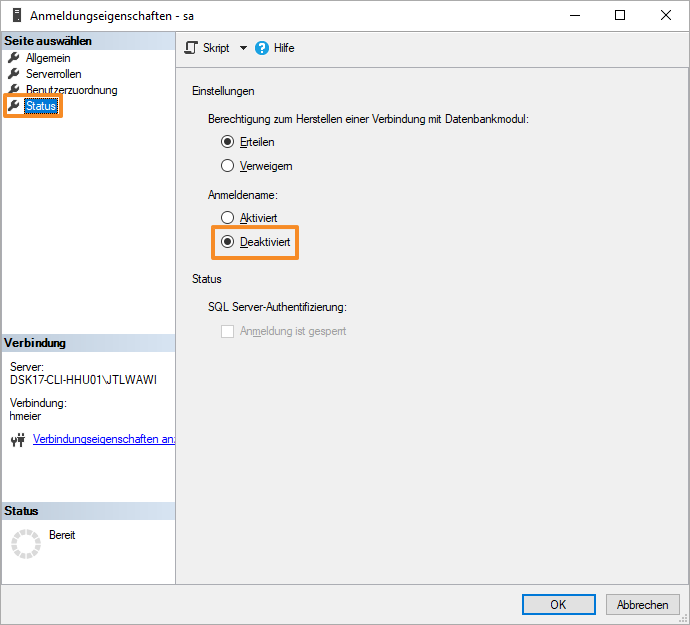
- Go to the menu item Status and check Deaktiviert (Deactivated) under Anmeldename (Login name).
User sa is now disabled. If you happen to need it again at some point in the future, log in with another user with sysadmin rights and repeat Steps 1–4. In the last step, choose the option Aktiviert (Enabled).
Related topics
