We are currently still building up the English documentation; not all sections have been translated yet. Please note that there may still be German screenshots or links to German pages even on pages that have already been translated. This guide mostly addresses English speaking users in Germany.
Purchase orders
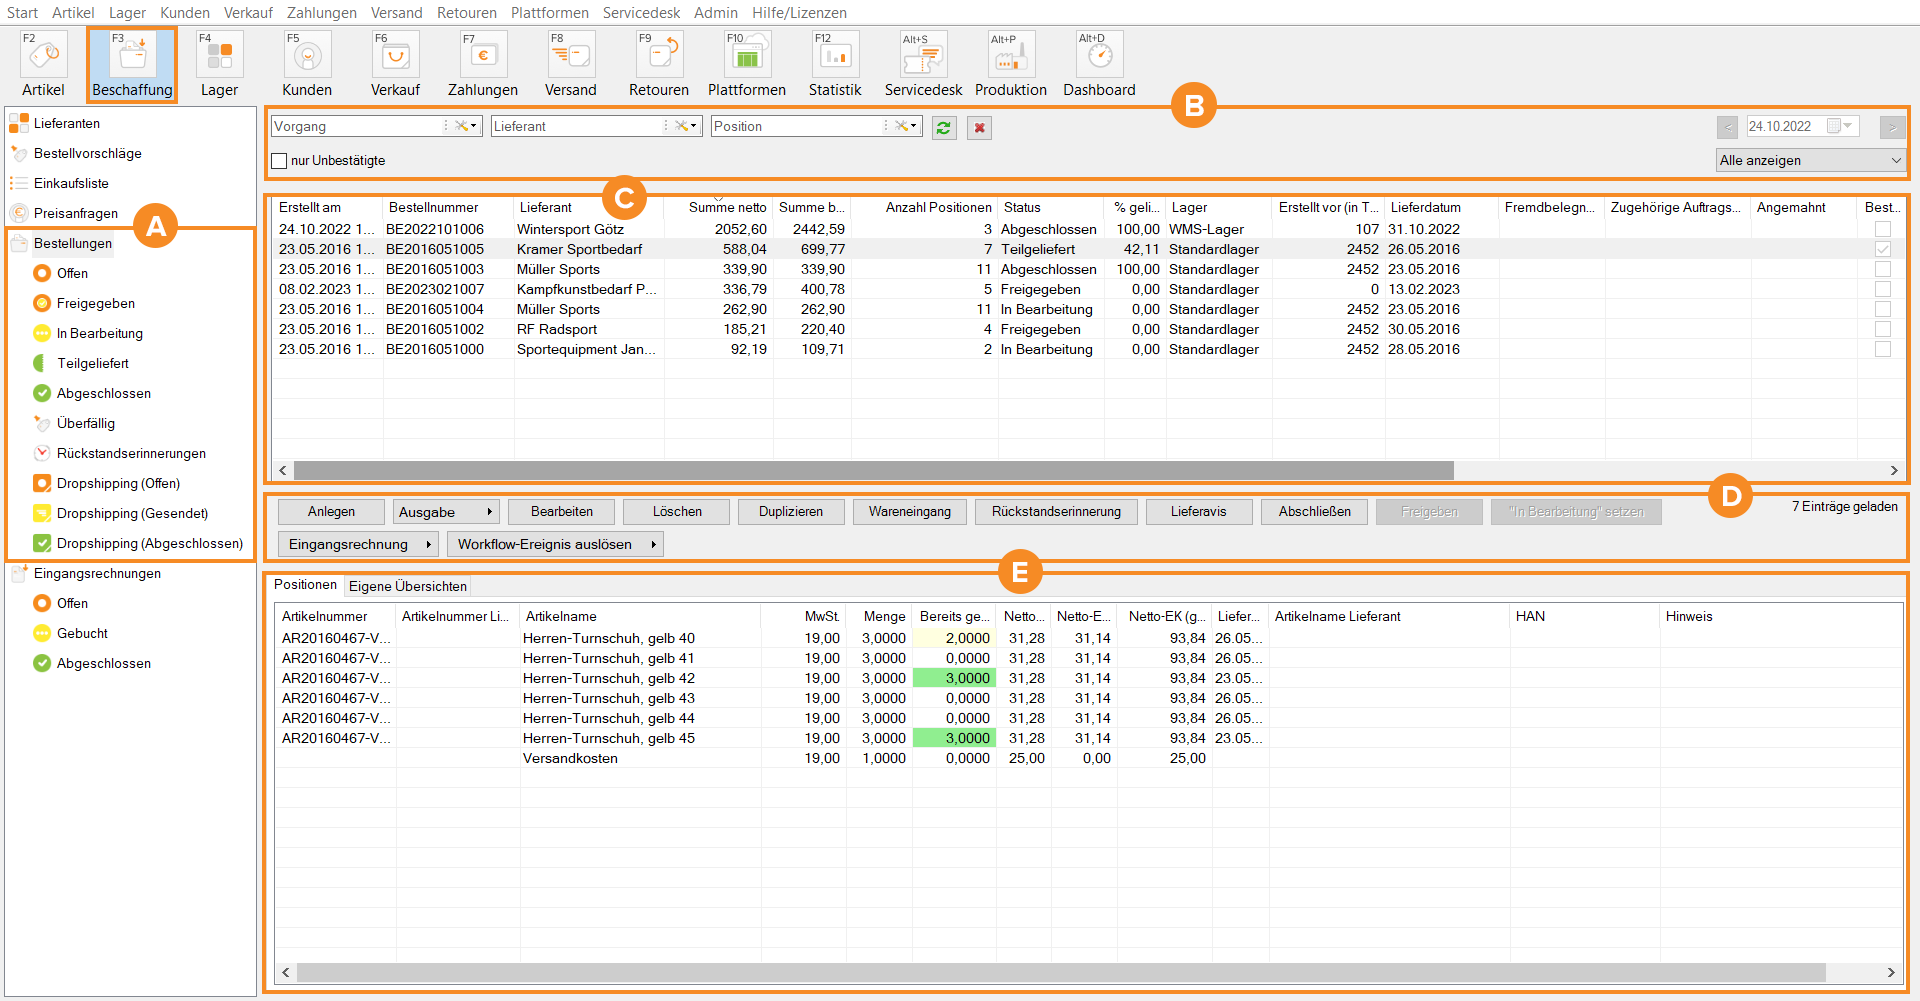
On this page you will find a detailed description of all functions in the Purchase orders area. You can reach this area by clicking on the Procurement icon in JTL-Wawi and selecting Purchase orders in the category structure.
Purchase orders help you get an overview of your purchasing. Purchase orders can be created easily and transferred to your stock upon delivery.
Area A: Folder
The Purchase orders folder area is divided into several categories. Here you can filter purchase orders and drop shipping orders by different statuses and create and output backorder reminders.
Status for purchase orders
The first 5 folders are statuses for purchase orders.
Open: If you work with approvals for purchase orders, all purchase orders initially end up in the Open folder. Learn how to activate approvals for purchase orders: Settings for purchase orders.
Approved: Once an open purchase order has been approved or if you work without approvals, it ends up in the Approved folder. Purchase orders in this folder have not yet been sent to the supplier. As soon as you place an order in the Approved folder using the Issue button, it will be moved to the Being processed status.
Being processed: Here you can find all purchase orders that are currently placed with the supplier and whose delivery you are still awaiting.
Partially delivered: Here you can find purchase orders for which at least one item has already been delivered and at least one item is still pending.
Completed: Here you will find all purchase orders that have been delivered completely.
Overdue
In this folder you will find purchase orders that have not yet been delivered or have not yet been delivered in full.
Backorder reminders
In this folder you will find all backorder reminders for purchase orders that have not yet been delivered and can issue them. Read here how to create backorder reminders: Reminding suppliers of open purchase orders.
Status for drop shipping orders
Drop shipping orders can have three different statuses. Read more about Drop shipping: Delivery via Drop shipping.
Drop shipping (Open): Here you can find all drop shipping orders that have not yet been transferred to the drop shipping supplier.
Drop shipping (Sent): As soon as an order has been issued or manually processed, it ends up in the Sent status.
Drop shipping (Completed): Here you can find all drop shipping orders that have been shipped by your drop shipping supplier and thus have been completed.
Area B: Search and filter options
In this area, depending on the selected folder, you can use the Transaction, Supplier, Line item and Customer search fields, which you can use to search your purchase orders by entering various criteria. You can further narrow your search in each search field via the drop-down menu. You can use the buttons next to the search field to update the search or delete the search field entry.
Transaction: Depending on which check box you activate, you can search for the Purchase order ID, the Reference purchase order ID and the External document number as well as activate the Exact search.
Supplier: Depending on which check box you activate, you can search for the Company, the Company suffix, the Supplier ID and your Internal customer ID, as well as activate the Exact search.
Line item: Depending on which check box you activate, you can search for the SKU, the Item name and the EAN as well as activate the Exact search.
Customer: Depending on which check box you activate, you can search for the Customer ID, the First or last name and the Shipping address of drop shipping orders as well as activate the Exact search.
Unconfirmed only: You can also view unconfirmed orders only. Activate the Unconfirmed only check box to do this.
You can also filter the searched orders by time period. Open the drop-down menu under the date display to set the time period.
Last 30 days: The orders of the last 30 days are displayed.
Last 90 days: The orders of the last 90 days are displayed.
Last 360 days: The orders of the last 360 days are displayed.
Year: If you use the year filter, you can select the year. All purchase orders of the specified year are displayed.
Month: If the month filter is used, all purchase orders of the specified month are displayed.
Day: If the day filter is used, all purchase orders of the specified day are displayed.
Deactivate date filter: Deactivates the date filter.
Show all: All purchase orders are displayed.
Section C: List of purchase orders
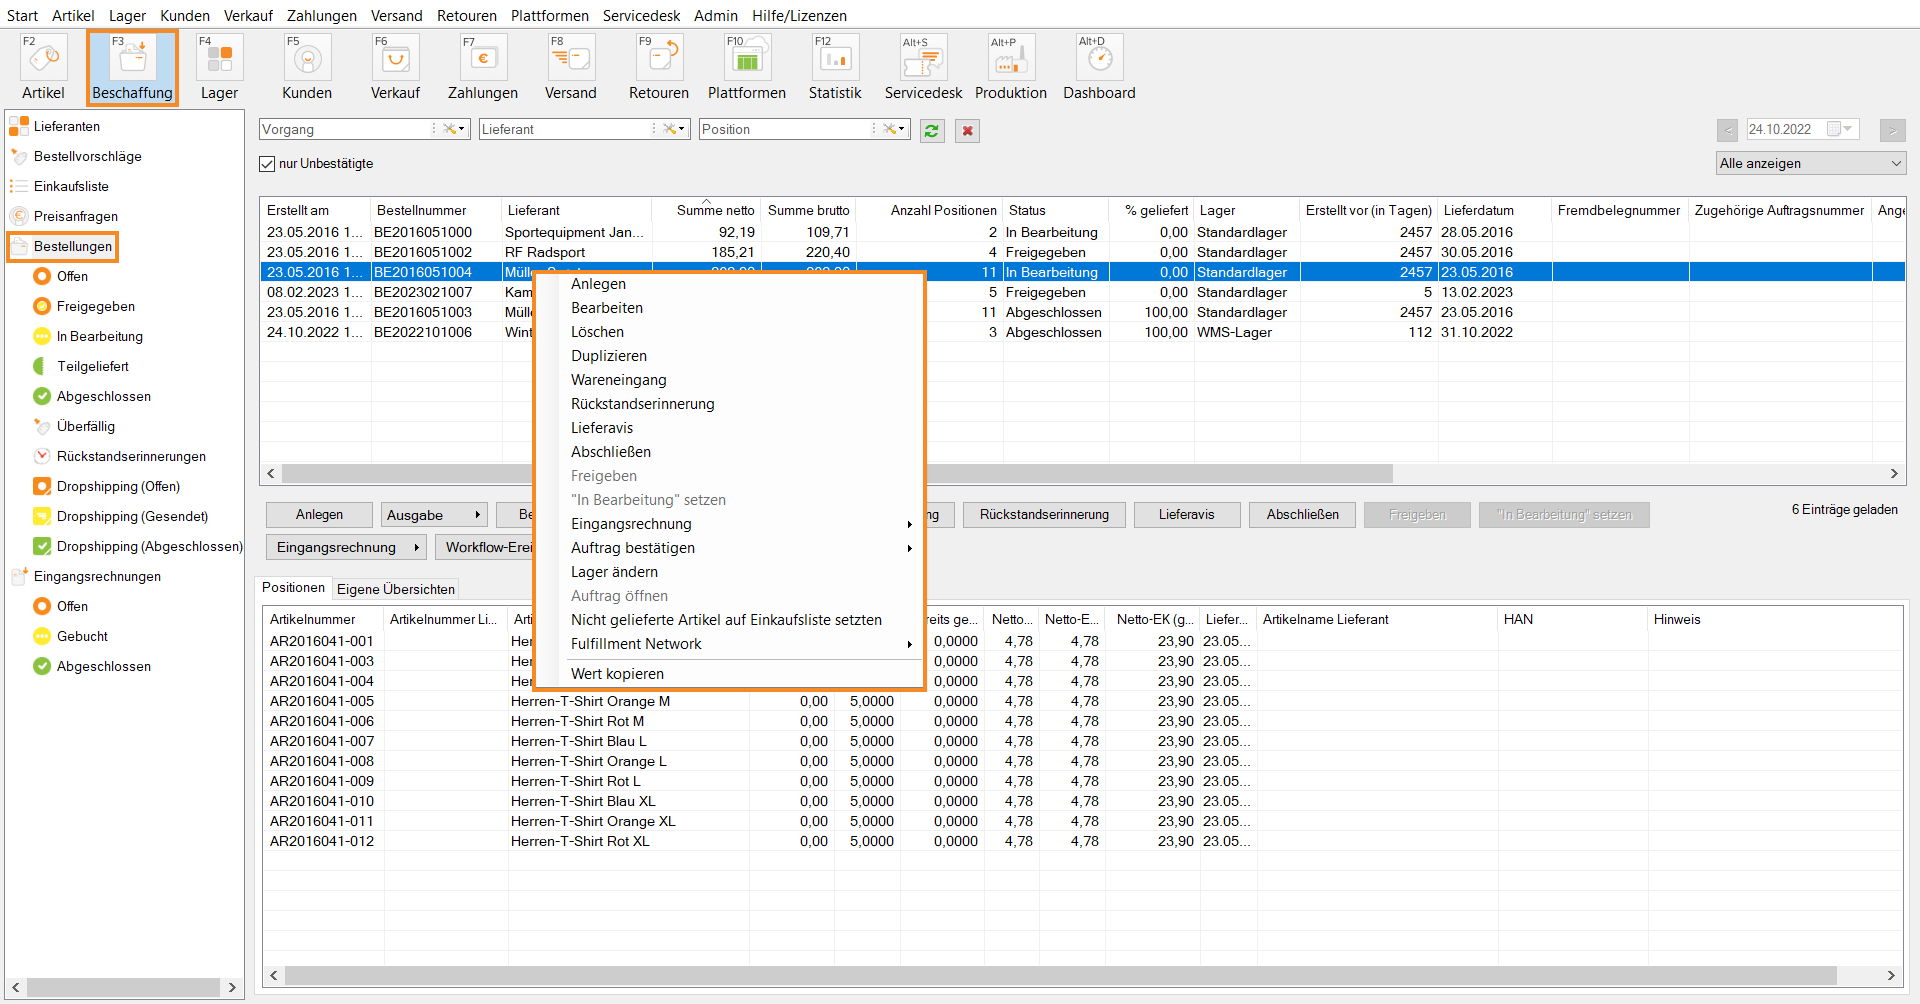
In the list you can see a list of all purchase orders, possibly filtered using the specified filters. Right-click on a purchase order to open the context menu.
Context menu
Create: Opens the Procurement dialogue box. Here you can create a new purchase order. Click here for more information on this topic: Creating and sending purchase orders.
Edit: Opens the selected purchase order in the Procurement dialogue box. Here you can edit the existing purchase order.
Delete: Click Delete to delete an order. Purchase orders can only be deleted if they have not been sent yet.
Duplicate: A purchase order is created again with the same settings of the selected purchase order.
Goods receipt: Opens the Performing goods receipt dialogue box. Here you can post your received purchase orders in your warehouse. Read more: Carrying out goods receipt.
Backorder reminder: Opens the Advanced output settings dialogue box. Here you can select the print template for the backorder reminders and then print them, send them by email or fax.
Despatch advice: Opens the Despatch advice dialogue box, in which you can add and edit a despatch advice. For more information on this topic, go here: Despatch advice.
Completed: Sets the selected purchase order to the Completed status.
Approved: If you work with approvals, you can approve purchase orders here.
Set to ‘Being processed’: Here you can change the status of the selected order to Being processed.
A/P invoice: Select either All line items or Delivered line items only. The Creating A/P invoices dialogue box opens. The selected line items are included in the A/P invoice. For this purpose, working with A/P invoices must be activated. Read more on: Entering A/P invoices.
Confirm purchase order: Here you can change the status of a purchase order from Unconfirmed to Confirmed. To do this, click on the black arrow and select Confirmed or Unconfirmed. The status of the selected purchase order is changed accordingly.
Change warehouse: The Assigning warehouses dialogue box opens. Here you can change the warehouse for the selected purchase order. This is not possible for purchase orders that have the status Being processed or Completed.
Open order: This option is only available for drop shipping orders and opens the customer’s original order.
Add undelivered items to purchase list: Adds the items of the order that have not been delivered yet to the purchase list. Further reading: Adding items to purchase list.
Fulfillment Network: Click on the black arrow > Detailed information to view the additional information for fulfilment orders sent to a fulfilment service provider.
Copy value: Copies the value of the selected cell to the clipboard.
Area D: Toolbar
Create
Opens the Procurement dialogue box. Here you can create a purchase order.
Issue
Here you can access the various issue methods. To do this, first select the document you want to issue. You can choose from the following:
Purchase order: Issues the purchase order.
Delivery note: If available, this option issues the delivery note for the purchase order.
Invoice: If available, this option issues the invoice for the purchase order.
Issue methods
You can choose between the following issue methods for each individual document:
Print: Outputs your document via the printer that was created for the corresponding document type in the Start menu > Printer.
Fax: Fax the document to the fax number stored in the order. You can also set the fax machine to be used in Start > Printer in the Fax tab under Fax machine.
Email: Sends the document by email to the email address specified in the order.
Save: Saves the document as a PDF. Default location is your Windows desktop.
Export: Exports the data to a predefined format (see also Managing export templates).
Preview: Creates a preview of the document.
Advanced: Opens the Advanced output settings dialogue box. Enables you to change the output settings and select a template set, for example.
Edit
The selected purchase order is opened in the Procurement dialogue box and can be edited here.
Delete
Deletes the selected order. Purchase orders can only be deleted if they have not been sent yet.
Duplicate
Another purchase order is created with the same settings of the selected purchase order.
Goods receipt
Opens the Performing goods receipt dialogue box. Here you can post your received purchase orders in your warehouse. Read more: Carrying out goods receipt.
Backorder reminder
Opens the Advanced output settings dialogue box. Here you can select the print template for the backorder reminders and then print them, send them by email or fax.
Despatch advice
Opens the Despatch advice dialogue box, in which you can add and edit a despatch advice. For more information on this topic, go here: Despatch advice.
Complete
Sets the selected order to the status Complete.
Approve
If you work with approval, you can approve orders here.
Set to 'Being processed'
Moves the order to the status Being processed.
A/P invoice
Use this option to specify which line items are to be included in the A/P invoice. Select either All line items or Delivered line items only. The Creating A/P invoices dialogue box opens. The selected line items are included in the A/P invoice. For this purpose, working with A/P invoices must be activated. Read more on: Entering A/P invoices.
Trigger workflow event
This button allows you to execute manual workflows for the selected sales order. Read more: Manual workflows.
Area E: Detailed view of orders
Line items tab
Here you can see all line items of a purchase order. By right-clicking on a line item, you can access the context menu with the following options:
Item can no longer be delivered, reduce order quantity accordingly: Sets the order quantity for the selected items to 0. In addition, a query will appear as to whether the selected items should also be deactivated for purchase order proposals. Reply with Yes, if you wish to do so.
Open item: Opens the item master data of a selected item.
Copy value: Depending on which cell you right-click on, you can copy the contents of the corresponding row to the clipboard.
Custom overviews tab
Use the plus symbol to create Custom overviews using SQL queries. For more information on this topic, click here: Creating custom overviews.


