We are currently still building up the English documentation; not all sections have been translated yet. Please note that there may still be German screenshots or links to German pages even on pages that have already been translated. This guide mostly addresses English speaking users in Germany.
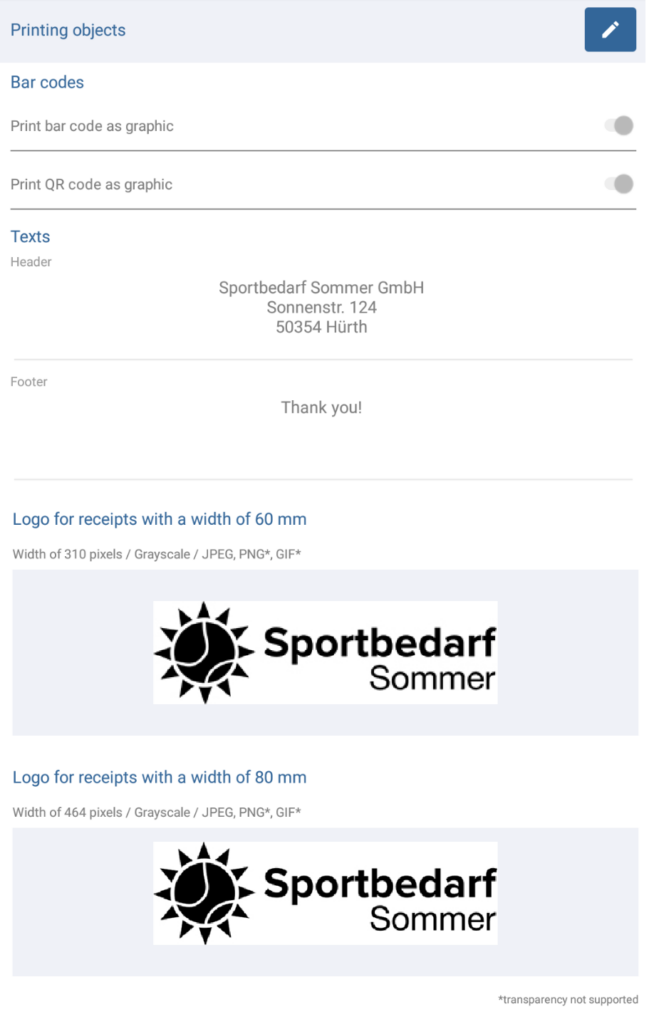
Dialogue box: Manage printing objects
The dialogue box Manage printing objects can be reached via the menu entry Settings > Printing objects. Here you can adjust the settings that affect all printers. This means you do not have to adjust the settings individually for each printer. In the printer settings, you can activate and deactivate the individual printing objects (Printers > Select appropriate printer > Enable Edit mode > Section: All receipts > Options Print header, Print footer and Print company logo).
Managing printing objects
Toolbar
“Edit” button: Tap this button to enter Edit mode. Once you are in Edit mode, the buttons in the toolbar will change.
“Save” button: Only visible in Edit mode. Saves all entered data/changes and ends Edit mode.
“Cancel/Close” button: Only visible in Edit mode. Discards any entered data, resets edited data to its original state, and closes the dialogue box.
Bar codes
Print bar code as graphic: Some printer models do not support generating bar codes using variables. For example, if you want to print a bar code on a receipt, the bar code must already be handed over as a graphic. With this option enabled, JTL-POS generates the graphic for the bar code before sending it to the printer.
Print QR code as graphic: Some printer models do not support generating QR Codes using variables. For example, if you want to print a QR code on a receipt, the QR code must already be handed over as a graphic. With this option enabled, JTL-POS generates the graphic for the QR code before sending it to the printer.
Texts
Header: Enter the text you want to display in the upper part of receipts, e.g. the company name and your contact data. In print templates, you can use the variable $header$ to insert the header.
Footer: The text you enter here is displayed in the lower part of receipts and can, for example, be used for advertisement campaigns. In print templates, you can use the variable $footer$ to insert the header.
Logos
Logo for receipts with a width of 60 mm: Add your company logo here. The logo is printed in greyscale. You use the following file types: JPG, PNG and GIF. The width of logos for receipt paper with a width of 60 mm is 310 px.
Logo for receipts with a width of 80 mm: Add your company logo here. The logo is printed in greyscale. You use the following file types: JPG, PNG and GIF. The width of logos for receipt paper with a width of 80 mm is 464 px.
Related topics
