We are currently still building up the English documentation; not all sections have been translated yet. Please note that there may still be German screenshots or links to German pages even on pages that have already been translated. This guide mostly addresses English speaking users in Germany.
Dialogue box: Manage printers
Managing printers
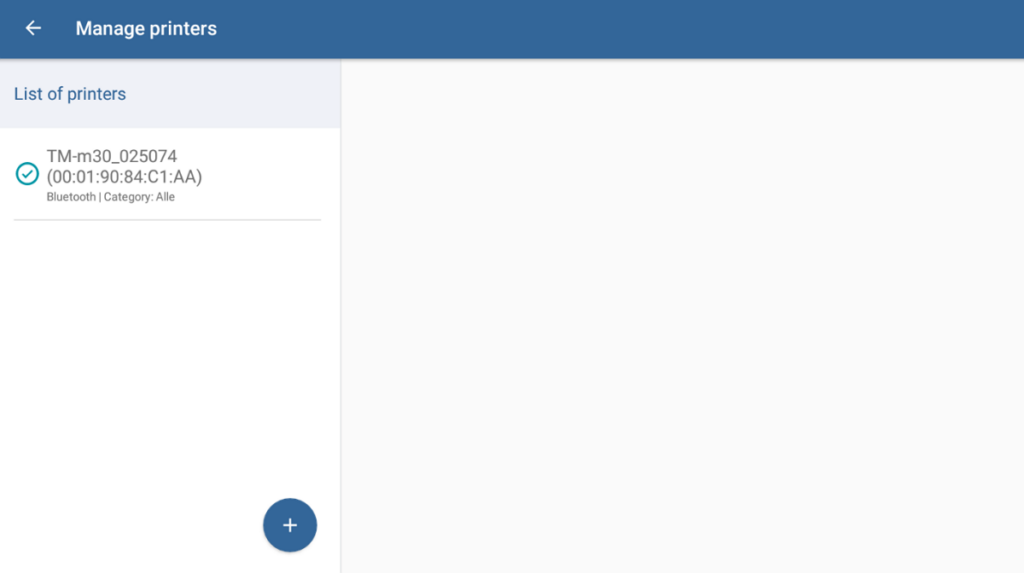
The dialogue box Manage printers can be reached via the main menu of JTL-POS under Printer. It contains a list of connected printers. Add new printers or edit and delete existing ones.
List of printers: Here, you can see all the printers that have been added.
Edit printer: Tap on the printer you would like to edit. A dialogue box with printer settings opens.
Delete printer: To delete a printer, hold your finger down on the printer until the confirmation request opens. Confirm with Yes.
“New printer” button (plus icon): Opens the dialogue Set up/Edit printers.
Dialogue box: Set up/Edit printer
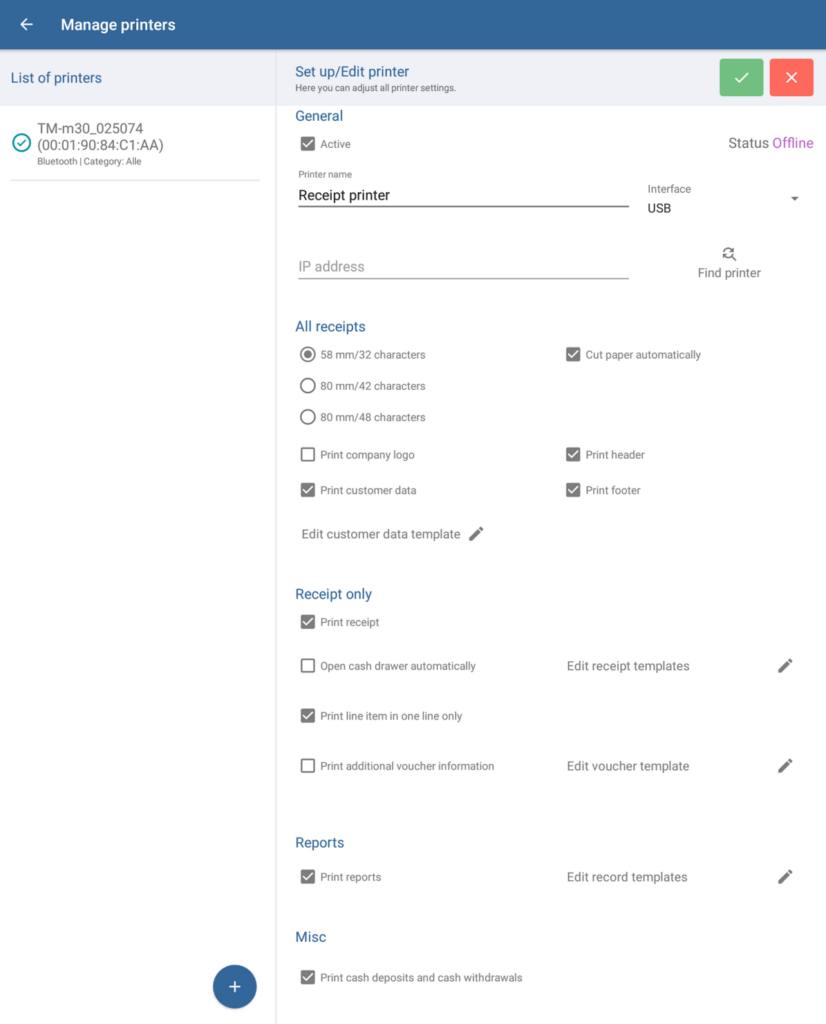
In this dialogue box you can adjust all settings of a new printer.
General
Active (selection box): Use this option to activate or deactivate a printer that has already been set up, for example if it should not be used temporarily.
Status: Shows whether your printer is online or offline on the network. If the printer is offline, no connection is possible. In case of problems with the printer, you can refresh the connection in dialogue boxes in which a printing process is supposed to start. To do this, tap on No printer online and check the status.
Printer name: Name of the respective printer. The name is filled out automatically if a device is selected using the search function. If you have already entered the name beforehand, it will be overwritten. You can change the name once the device has been selected.
Interface: Interface for the connection between printer and JTL-POS. If a printer is already connected, the respective interface is displayed.
IP address: IP address of the respective printer. Required to connect a printer and JTL-POS. The IP address can only be entered or edited if the selected interface is LAN/WLAN.
Find printer: Depending on your selection for the option Interface, you can use the function Find printer to find devices connected to your device via the respective interfaces. You can select the appropriate printer from the list.
All receipts
58 mm/32 characters, 80 mm/42 characters, 80 mm/48 characters (toggle button): Specify the width of your receipts and how many characters can be printed on this width.
Print company logo: Enable this option if you want your company logo to be printed on all receipts printed by this printer. You can save your logo in the general printer settings (menu Settings > Printing objects).
Print customer data: Enable this option to print customer data on every printout of this printer. You can, for example, issue the customer ID, first and last name, company name and address data on the receipt. The receipt template can be opened and edited in this dialogue box via the option Edit customer data template.
Cut paper automatically: Enable this option if your receipt printer has a cutting mechanism and you want receipts to be cut automatically.
Print header: Enable this option if you want your custom header to be printed on every printout of this printer. The contents of this header are edited in the general printer settings in the menu Settings > Printing objects.
Print footer: Enable this option if you want your custom footer to be printed on every printout of this printer. The contents of this footer are edited in the general printer settings in the menu Settings > Printing objects.
Receipt only
Print receipt: Enable this option if receipts are to be printed with this printer.
Open cash drawer automatically: Enable this option if you want the cash drawer to open when a receipt is printed.
Print line item in one line only: With this option enabled, texts describing individual line items on receipts are printed in one line only (e.g. item name and SKU). When texts are too long, they are cut off. With this option disabled, the entire text that you defined in the receipt template is printed no matter how long it is. The text is then accordingly distributed over several lines.
Edit receipt templates: Use the Edit button to open the print template of your receipts. You can then adjust the content and layout according to your requirements. Please find the overview of the Variables, commands, and formatting for print templates here.
Edit business expenses receipts: Use the Edit button to open the print template of your business expenses receipts. You can then adjust the content and layout according to your requirements. You only see this option if the gastronomy features are activated (see Manage cash register settings). Please find the overview of the Variables, commands, and formatting for print templates here.
Internal receipt
These options are available to you if the gastronomy features have been activated in the Cash register settings.
Print internal receipt: Enable this option if you want internal receipts such as kitchen receipts, workshop receipts, etc. to be printed with this printer.
One receipt per line item: With this option enabled, every line item is printed on a separate internal receipt (e.g. kitchen receipt).
Print copy of internal receipt: Enable this option if copies of internal receipts are to be printed with this printer.
Edit internal receipt templates: Use the Edit button to open the print template of your internal receipts. You can then adjust the content and layout according to your requirements. Please find the overview of the Variables, commands, and formatting for print templates here.
Only print internal receipt for item category: Select the categories whose items are to be issued on internal receipts. You can either select all categories or a specific one. If you select a specific category and not all items actually appear on internal receipts, check whether the items have been assigned to the right category.
Reports
Print reports: Enable this option if intermediate reports and day-end closing reports are to be printed with this printer.
Edit report templates: Use the Edit button to open the print template of the internal reports. You can then adjust the content and layout according to your requirements. Please find the overview of the Variables, commands, and formatting for print templates here.
Misc
Print cash deposits and cash withdrawals: Enable this option to print documents with this printer to record cash deposits and cash withdrawals.
Related topics

