We are currently still building up the English documentation; not all sections have been translated yet. Please note that there may still be German screenshots or links to German pages even on pages that have already been translated. This guide mostly addresses English speaking users in Germany.
JTL-POS ERPConnected - the POS system for JTL-Wawi
Connecting JTL-POS to JTL-Wawi
Your task/initial situation
Requirements/Restrictions
Firewall settings
Adding inbound/outbound rules
The following description applies to both the creation of an inbound rule and an outbound rule.
- From the client or server on which the JTL-Wawi database is located, open the Firewall and network protection dialogue box via the Windows menu > Settings > Network and internet > Status > Windows Firewall.
- Click on Advanced settings.
- On the left, select Inbound rules. If you have already created the inbound rule, select Outbound rules.
- On the right side, select the menu item New rule….
- For the rule type, select Custom and click Next.
- In the next step, under Program, select All programs and then click Next.
- Select TCP as the protocol type.
- Under Local port, select Specific ports and enter 443 as the port.
- Under Remote port, select Specific ports and enter 443 as the port.
- Click Next.
- Under Which local IP addresses does this rule apply to?, select These IP addresses and click on Add.
- Select These IP addresses, enter the IP address of the JTL-Wawi server and click OK.
- Under Which remote IP addresses does this rule apply to?, select the option Any IP address.
- Click Next.
- In the Action step, select Allow the connection and click Next.
- In the Profile step, select the Firewall profiles to which this rule applies and click Next.
- Lastly, in the Name step, enter a unique name for the rule in the Name field and, optionally, enter a description.
- Then click Finish.
Once you have created the inbound rule, repeat steps 1–18 to create an outbound rule. However, in Step 3, select Outbound rules from the menu.
Connecting JTL-POS to JTL-Wawi
Changing settings in JTL-Wawi
- Open JTL-Wawi, version 1.4.30.2 or higher.
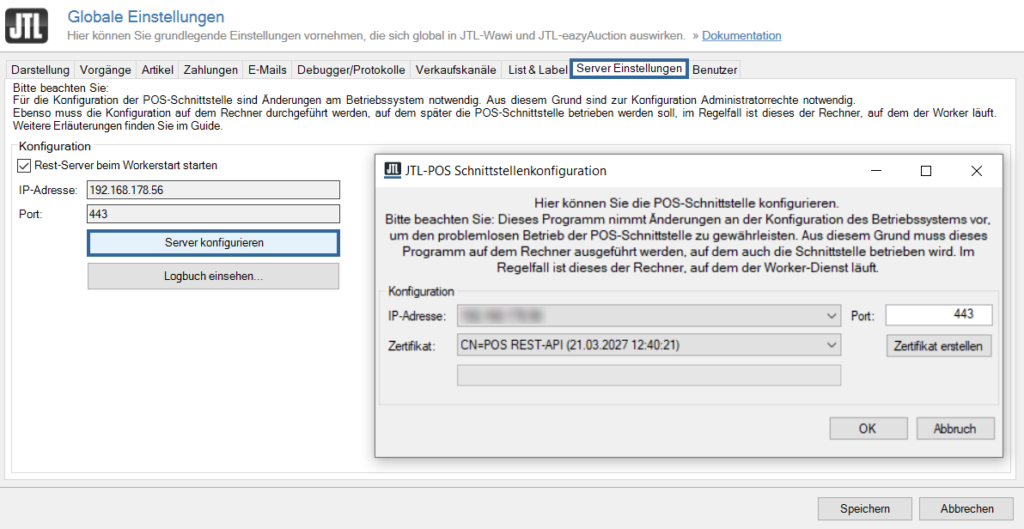
- Go to Admin > Global settings, and the Global settings dialogue box will open.
- Switch to the Server settings tab.
- Click on Configure server. The dialogue box Interface configuration for JTL-POS will open.
- Enter the IP address of the JTL-Wawi server in the field IP address. If there are several options available, please do not select 127.0.0.1 (localhost).
- Enter the 443 port into the Port field.
- If necessary, create a new certificate by clicking on Create certificate.
- Confirm with OK.
- Make sure that the option Start REST server when starting JTL-Worker is enabled (see next step).
- Switch to the Processes tab.
- In the Orders/Invoices area, select the Show transactions from external POS systems in JTL-Wawi check box.
- Click on Save to save the settings.
- Restart JTL-Wawi for the changes to take effect.
Opening JTL-Worker
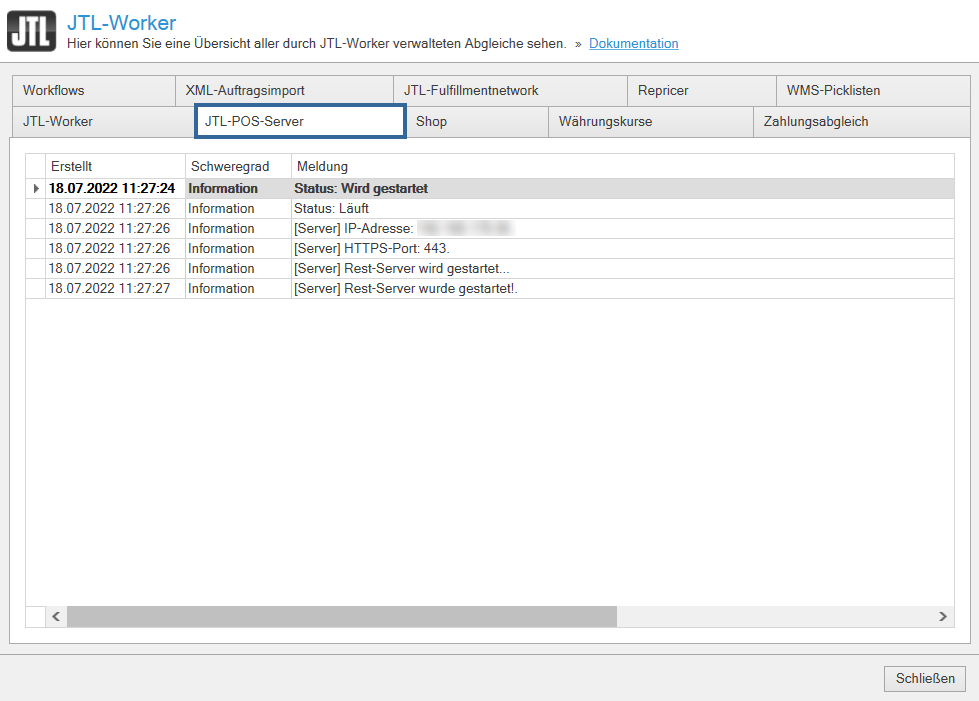
- Open JTL-Worker as an administrator via the Windows start menu.
- Switch to the JTL-POS server tab. In this window, you can see current connection information. It should be displayed that the REST server has been started.
- Do not close the window, just minimize it. You do not need to make any further adjustments to the JTL-Worker.
Connecting JTL-POS to JTL-Wawi
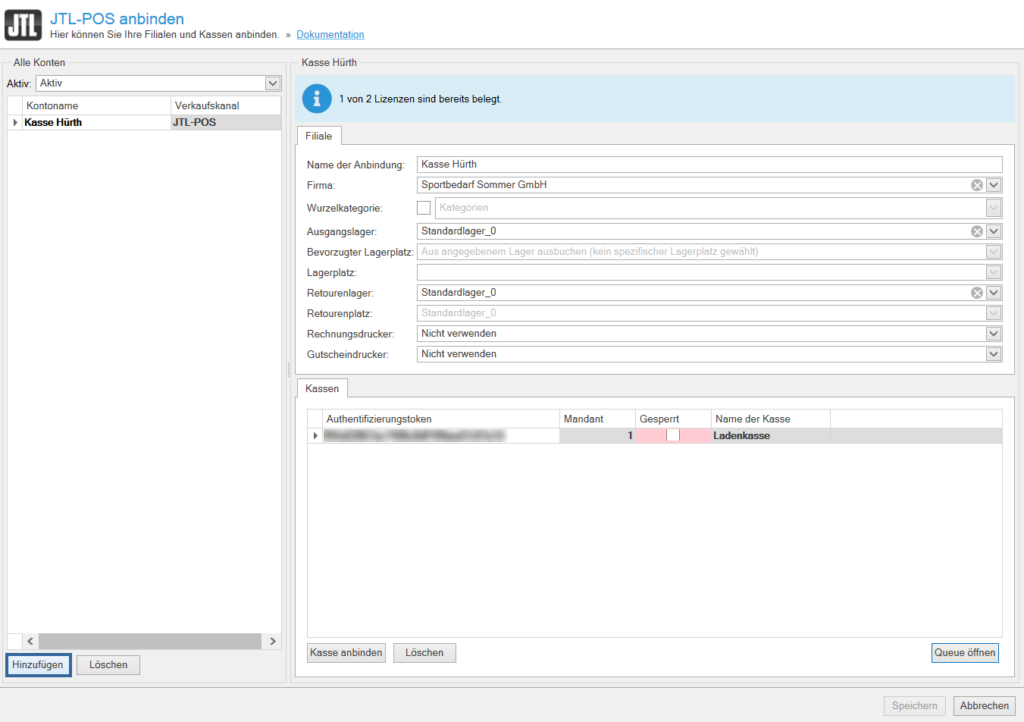
- Go to Admin > JTL-POS settings to open the dialogue box JTL-POS.
- Click Add. A new cash register will be created.
- Complete the information in the tab Branch office.
- Click on Connect cash register. The dialogue box JTL-POS will open. Here, you will see the important connection data to be entered into JTL-POS.
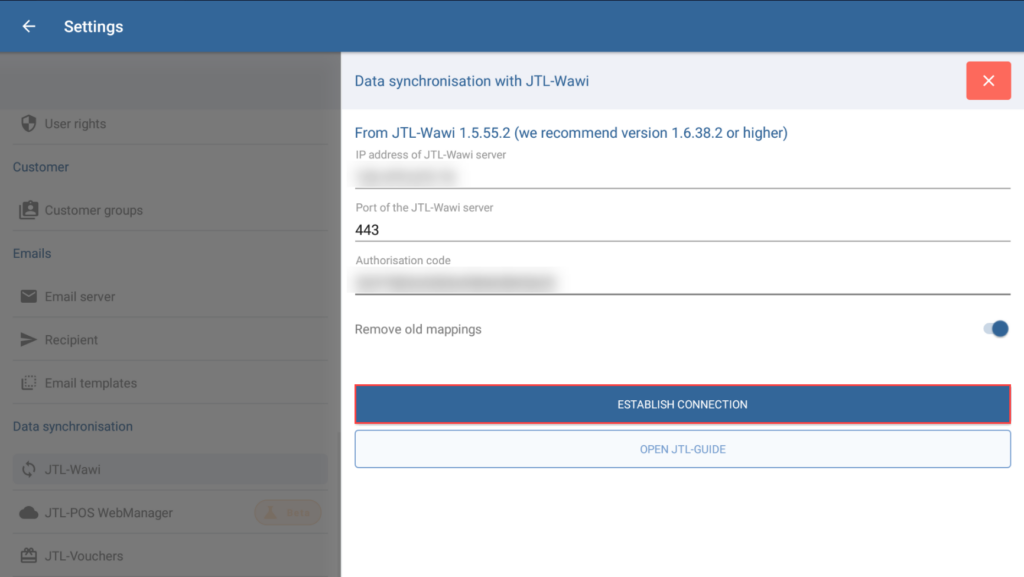
- In JTL-POS, go to Settings > JTL-Wawi and the dialogue box Data synchronisation with JTL-Wawi.
- Enable Edit mode, by clicking on the pen icon and enter the data displayed in JTL-Wawi.
- Tap on Establish connection.
- In the dialogue box Connecting a POS system in JTL-Wawi, click Save to apply all settings.
- If you have entered the data correctly, JTL-Wawi will display the message The cash register has been successfully connected. Click OK to exit the window.
- In JTL-POS, tap on Save. Your data will then be saved.
JTL-POS is now connected to JTL-Wawi. As a next step, you can enable your categories and items in JTL-Wawi for JTL-POS and perform a data synchronisation.
Enabling categories/items for JTL-POS
To import categories and items into JTL-POS with data synchronisation, you first need to enable the respective categories and items for the synchronisation with JTL-POS. For more information on this topic, click here: Enabling categories and items for JTL-POS.
Related topics
JTL-POS ERPConnected - the POS system for JTL-Wawi
