We are currently still building up the English documentation; not all sections have been translated yet. Please note that there may still be German screenshots or links to German pages even on pages that have already been translated. This guide mostly addresses English speaking users in Germany.
Category master data: Category images
On this page you will find a detailed description of all the options in the Category images tab of the category master data. To learn how to create categories, please read the relevant scenario.
In JTL-Wawi, you can assign your own category image to each of your categories. All images can be assigned and managed separately for each output method or platform. This allows you, for example, to assign different images to the same category in JTL-Wawi and the online shops you manage, in addition to different names and descriptions.
Category images and graphics are crucial for a convincing and user-friendly illustration of your navigation in the online shop. Depending on how many images you want to use on a page, pay attention to web-friendly file or size conversions to avoid long loading times and to not negatively impact the speed of your category page.
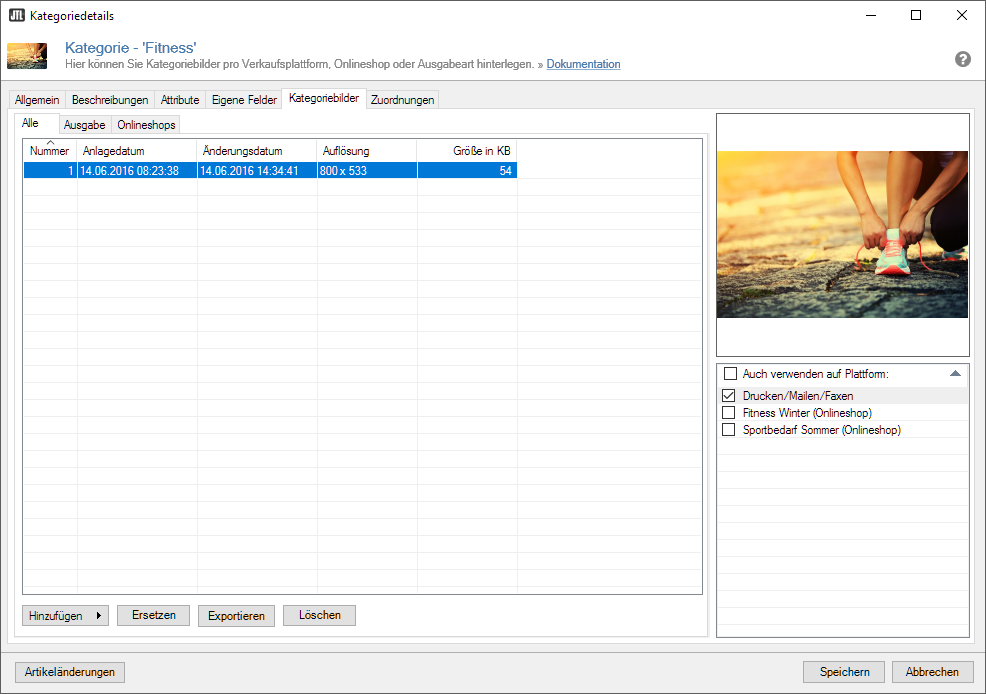
The pane below the Category images tab shows you an overview table for your category images, a preview area and the platform assignment via check boxes.
Images overview table
In the overview table, you can manage your category images. If you have not yet entered an image for your category, this table is empty. Now click on the arrow of the Add button below the overview table. The selection menu opens with the options From directory and Other sources.
Image: From directory
Select this option if you want to load new category images from your computer directly into the database. In the dialogue box Adding images, open the corresponding folder and select an image that you want to assign to your category. After confirming your selection, the category image will appear in your overview table.
Image: Other sources
This option allows you to import a category image into your database from other sources, such as from a folder on your computer or from a URL.
- In the new dialogue box Importing images from other sources, enter only one path per line for your category images.
- After entering the source, click Import. Your images will now be imported into JTL-Wawi.
In addition to these two image selection options, you also have another convenient option for importing your category image into JTL-Wawi.
Image via drag & drop
Regardless of the option selected, you can also transfer your desired category images directly via drag & drop from your local folders or from your browser. To do this, select the corresponding image or the files with your mouse and drag them to the desired position in your overview table. The category images then appear immediately in the image list.
Now let’s look at the information that the overview table provides. As soon as one or more images are listed, you can view the information in the Resolution and Size in KB columns. The resolution indicates width x height of your category image in pixels. Ideally, these dimensions should not exceed the maximum output size for your platform/online shop.
The Size in KB field gives you the actual size of your image in kilobytes. Again, be sure to properly compress and convert the image files for your purposes to keep loading times and speed of your pages optimal.
JTL-Wawi offers you a helpful tool for this purpose, which you can call up via Items > Image sizes. For more information on using this tool, please see Editing image sizes.
Below the overview table you can find further options for managing your category images: Use Replace to exchange images and Export to load the desired images to the desired position on your computer. With Delete, you remove selected images from the JTL-Database.
Preview & platform selection
As soon as one or more category images are listed in your overview table, you can select a corresponding image row. The respective preview image is now displayed in the preview area on the right side of the dialogue box.
Image assignment
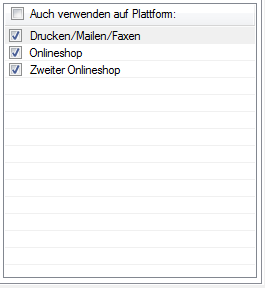
In the Platform assignment area below the preview image, you can assign your category images loaded into the database to the different output methods or platforms. All output methods/portals that are available to you are listed one below the other in the platform assignment and provided with corresponding check boxes. If you manage several online shops via JTL-Wawi, these are also listed here individually, so that they can be controlled separately. Select your desired category image by clicking in the overview table and view the existing or non-existent check marks in the platform assignment. Now assign the category image according to your wishes. For example, your check box list might look like this:
Name (title line)
Use the upper check box for the title line “Name” to activate or deactivate all check boxes for the output methods/portals listed below.
Print/Email/Fax
If you also work with category images when printing sales quotations or want to use corresponding images in your email communication, you can make the corresponding selection for this output method here.
Your online shop 1
Select the corresponding online shop to assign the desired category image for your first online shop.
Your online shop 2
If desired, select a different category image for your second online shop and assign it via the corresponding check box.
Once you have made all the settings according to your wishes, please confirm your entries with Save. Your newly assigned category images are now available to the output methods and will also be visible in the online shops after the next online shop synchronisation.
Related topics

